
이전 포스팅에 이어서 Spring Security 기반으로 소셜 로그인 기능 추가에 대해서 알아보겠습니다. Security 설정 및 개념, Google 소셜 로그인에 대해 알아보시는 분들은 아래 포스팅을 참고해 보시면 좋을 거 같습니다.
[ Spring Boot ] OAuth2 - Google 소셜 로그인
이어서 Google 소셜 로그인에 대해서 포스팅해보겠습니다. 이전 포스팅에서 구글 클라우드 프로젝트 생성 후 클라이언트 ID , 클라이언트 보안 비밀번호 토큰 값을 생성했습니다. 그렇다면 생성한
drg2524.tistory.com
[ Spring ] Security 개념
Security란? 시큐리티(Security)는 소프트웨어 시스템의 보안과 관련된 개념입니다. 주로 웹 애플리케이션, 모바일 앱, 서버 등에서 사용되며 사용자 인증(Authentication), 권한 부여(Authorization), 데이터
drg2524.tistory.com
소셜 로그인은 일상에서 흔히 보이는 로그인 및 회원가입 방식으로, 요즘 웹 사이트에서는 없어서는 안되는 기능으로 자리를 잡고 있습니다.
이전 포스팅에서 google 소셜 로그인을 알아봤었는데, 기본적으로 google , facebook 은 provider입니다. 그래서 별도로 추가적인 설정 없이 yml 파일에 설정해서 기능을 추가했었는데, naver는 기본적으로 provider가 아닙니다. 그래서 추가적으로 설정해줘야 하는 코드가 있습니다.
일단 코드 구현을 뒤로하고 naver 소셜 로그인을 하려면 어떻게 흘러가는지, 먼저 간단하게 설명 드리겠습니다.
Spring Security(Naver 소셜 로그인 구현 방법)
1. Naver 개발자 센터에서 애플리케이션 등록
- Naver 개발자 센터(https://developers.naver.com/)에 로그인하고 애플리케이션을 등록합니다.
- 애플리케이션 등록 후, 클라이언트 아이디(Client ID)와 클라이언트 시크릿(Client Secret)을 받습니다.
2. Spring Security 의존성 추가
- Maver이나 Gradle 프로젝트의 의존성 관리 파일에 Spring Security를 추가합니다.
3. 소셜 로그인 구성
- Spring Security 구성 파일에 소셜 로그인을 위한 구성을 추가합니다.
- 'application.properties/yml' 파일에 Naver 소셜 로그인 관련 속성을 설정합니다.
4. 로그인 링크 생성
- 로그인 버튼을 눌렀을 때 Naver 소셜 로그인 페이지로 이동하는 링크를 생성합니다.
- 링크에는 Naver 개발자 센터에서 발급받은 클라이언트 아이디와 리다이렉트 URI를 포함해야 합니다.
5. 로그인 성공 후 처리
- 로그인이 성공하면 Naver에서 리다이렉트 URI로 사용자 정보와 액세스 토큰을 전송합니다.
- 전송된 정보를 사용하여 사용자 인증 및 애플리케이션 내 로그인 처리를 수행합니다.
전체적인 구현 과정을 단계별로 정리를 했습니다.
다음으로 직접 프로젝트를 생성하고 구현해 보겠습니다.
NAVER PROJECT CREATE
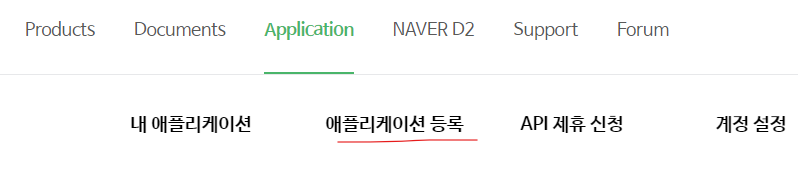
1. Developers 사이트에서 로그인 후 상단 메뉴바에 있는 application -> 애플리케이션 등록 페이지 이동
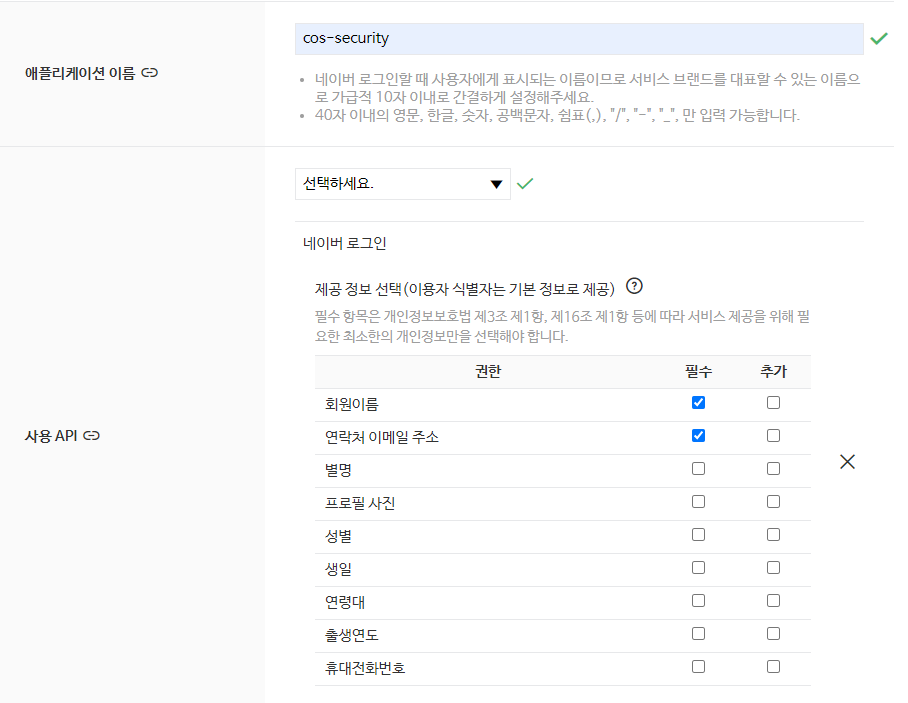
2. 애플리케이션 이름을 설정해 주시고 사용 API에 있는 카테고리에서 네이버 로그인을 선택해서 권한 설정을 해줍니다.
3. 로그인 오픈 API 서비스 환경에 있는 환경 추가 카테고리를 열어서 PC웹을 선택하시면 아래처럼 서비스 URL TEXT 창이 나옵니다.
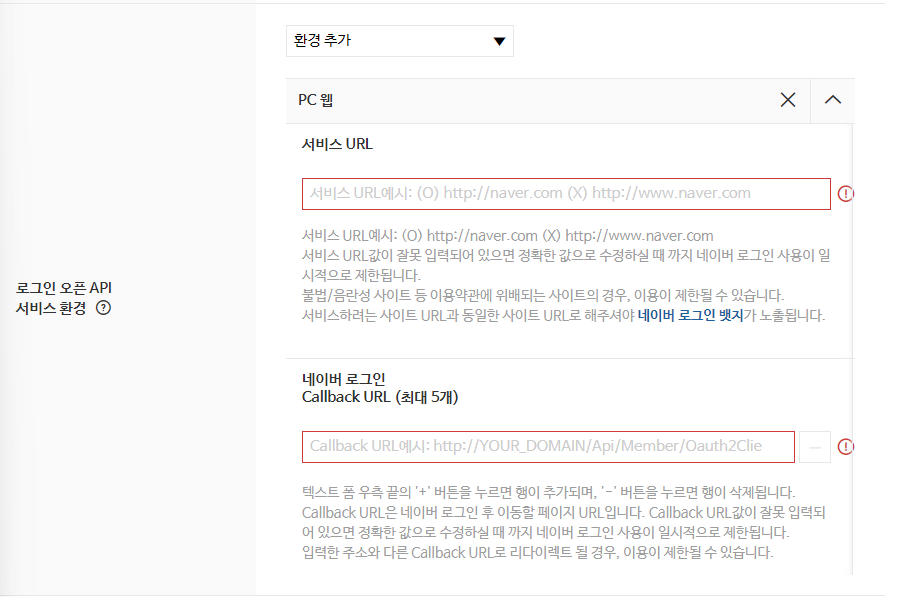
프로젝트를 생성할 때 가장 중요하다고 생각하는 부분이라서 스펠링 및 경로 설정을 제대로 해주셔야 합니다.
위 사진에서 안내해 주는 URL은 다음과 같습니다.
- 서비스 URL : http://MyDomain 형식으로 서비스 URL을 입력합니다.
- 네이버 로그인 Callback URL : http://MyDomain/oauth 형식으로 Callback URL을 입력합니다.

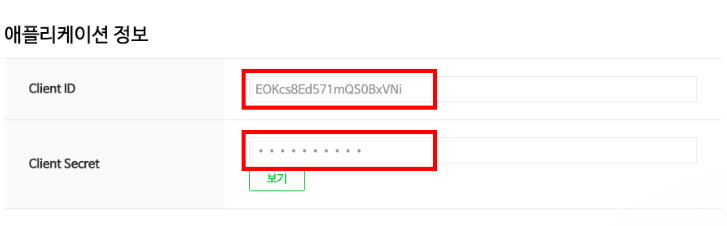
4. 프로젝트 생성 하시면 애플리케이션 정보에 Client ID , Client Secret 토큰 값이 생성합니다.
(메모장에 복사해두세요.)
여기까지 네이버 애플리케이션 생성 과정입니다. 다음으로는 설정 및 구현을 해보겠습니다.
이전 포스팅에 이어서 Security 설정 코드에 naver 소셜 로그인을 추가하려고 합니다.
application.yml
yml 파일 형식은 줄 형식이 안 맞으면 바로 에러가 발생합니다. 그렇기 때문에 줄 형식도 잘 지켜주면서 설정을 해주셔야 합니다.
먼저 코드 사진을 보고 말씀드리겠습니다.
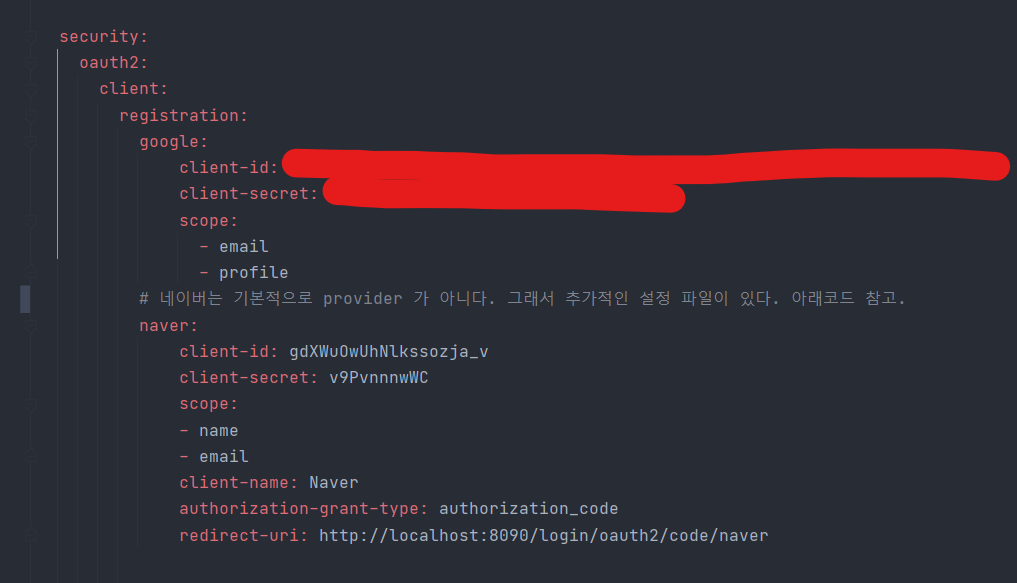
원래 코드블록으로 작성해서 올리지만, yml 설정 파일의 줄 형식에 대해서 자세하게 알려드리기 위해 캡처 사진으로 올립니다. 코드는 아래에 올리겠습니다.
  security:
    oauth2:
      client:
        registration:
          google:
              client-id: #애플리케이션 정보에서 제공해주는 클라우드 ID
              client-secret: #애플리케이션 정보에서 제공해주는 클라우드 시크릿번호
              scope:
                - email
                - profile
          # 네이버는 기본적으로 provider 가 아니다. 그래서 추가적인 설정 파일이 있다. 아래코드 참고.
          naver:
              client-id: gdXWuOwUhNlkssozja_v
              client-secret: v9PvnnnwWC
              scope:
              - name
              - email
              client-name: Naver
              authorization-grant-type: authorization_code
              redirect-uri: http://localhost:8090/login/oauth2/code/naver
네이버 API 생성할 때 받은 클라우드 ID, 시크릿 번호를 미리 적어둔 메모장에서 가져와서 적어줍니다.(띄어쓰기 조심)
그리고 scope를 보시면 저는 name, email을 적어두었습니다.
이건 바로 처음에 API 생성할 때 권한 설정 했던 회원이름, 이메일입니다.
다음으로
authorization-grant-type: authorization_code
이건 무슨 의미일까요??
'authorization-grant-type: authorization_code'는 OAuth2.0 인증 프로토콜에서 사용되는 인증 부여 유형을 나타냅니다.
자세한 설명은 아래 TIP에 적어두겠습니다.
redirect-uri는 Callback URL에 설정했던 경로를 적어주시면 됩니다.
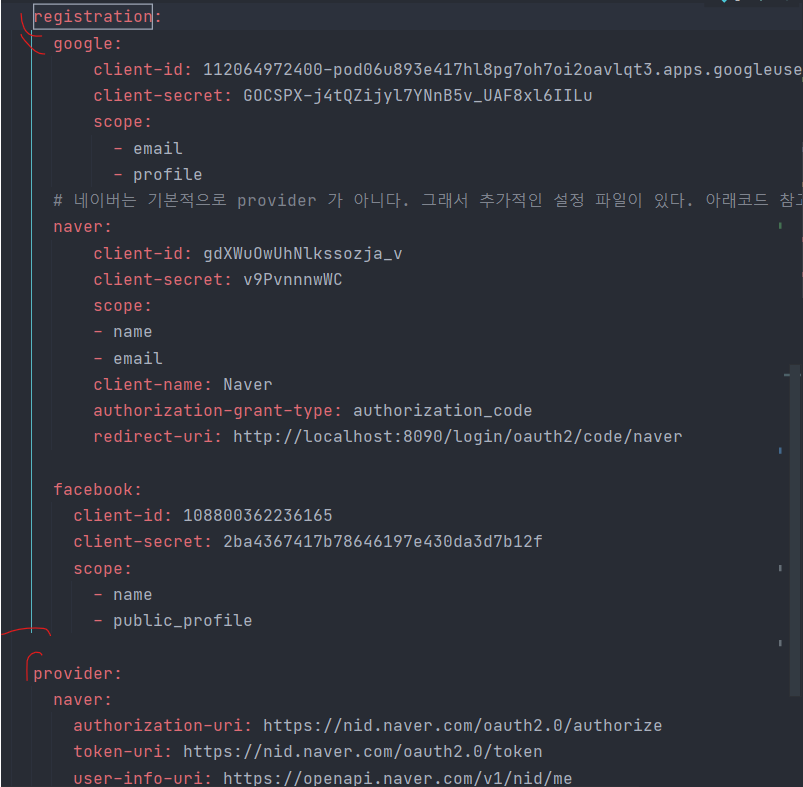
위 설정 코드만 봐도 google에서는 별도로 작성하지 않아도 되는 설정이 naver에서는 보입니다.
하지만 여기서 끝이 아니라 처음에 말씀드렸던 것처럼 provider가 아니기 때문에 provider 설정도 해주셔야 합니다.
provider 설정은 client 줄 하위에 설정해주셔야 합니다.
google , naver는 registration 하위에 설정한 걸 위 사진에서 확인할 수 있습니다.
그럼 provider 설정은 어떻게 하는지 먼저 코드를 보고 설명드리겠습니다.
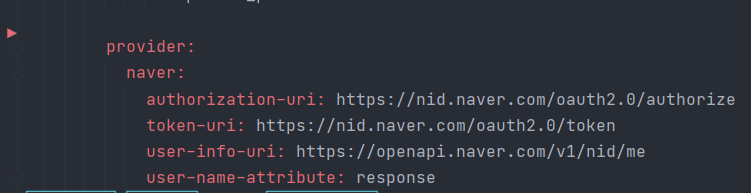
여기서는 네이버 Developers 개발 가이드를 참고하시면서 작성해주셔야 합니다.
자세한 정보는 개발 가이드를 참고해 보시면 됩니다.
- authorization-uri : 네이버 로그인 연동 URL 생성
- token-uri : 접근 토큰 발급 요청
- user-info-uri : 접근 토큰을 이용하여 프로필 API 호출
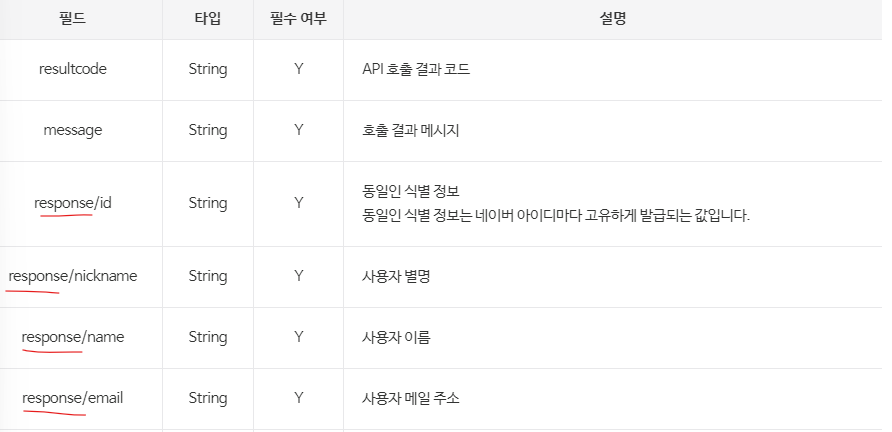
- user-name-attribute : 회원정보를 JSON으로 받는데, response라는 키 값으로 네이버가 리턴해줍니다.
TIP)
authorization-grant-type: authorization_code?
OAuth 2.0은 사용자가 제한된 범위의 권한으로 애플리케이션에 접근할 수 있도록 하는 프로토콜입니다.
인증 부여 유형은 애플리케이션이 사용자를 인증하고 액세스 토큰을 얻는 방법을 결정합니다.
이 중 'authorization_code'는 가장 일반적으로 사용되는 인증 부여 유형 중 하나입니다.
'authorization_code' 인증 부여 유형은 다음과 같은 단계로 이루어집니다.
1. 사용자가 애플리케이션에 접근하려고 할 때, 애플리케이션은 인증 서버에 사용자를 리다이렉트 시킵니다.
2. 사용자는 인증 서버에 로그인하고 애플리케이션이 요청한 권한을 승인합니다.
3. 인증 서버는 애플리케이션에 대한 인가 코드(authorization_code)를 발급합니다.
4. 애플리케이션은 발급받은 인가 코드를 사용하여 인증 서버에게 액세스 토큰(access token)을 요청합니다.
5. 인증 서버는 액세스 토큰을 발급하고, 이를 사용하여 애플리케이션이 사용자의 리소스에 접근할 수 있도록 허용합니다.
'authorization_code' 인증 부여 유형은 보안 측면에서 강력하며, 액세스 토큰을 안전하게 교환하는 데에 사용됩니다.
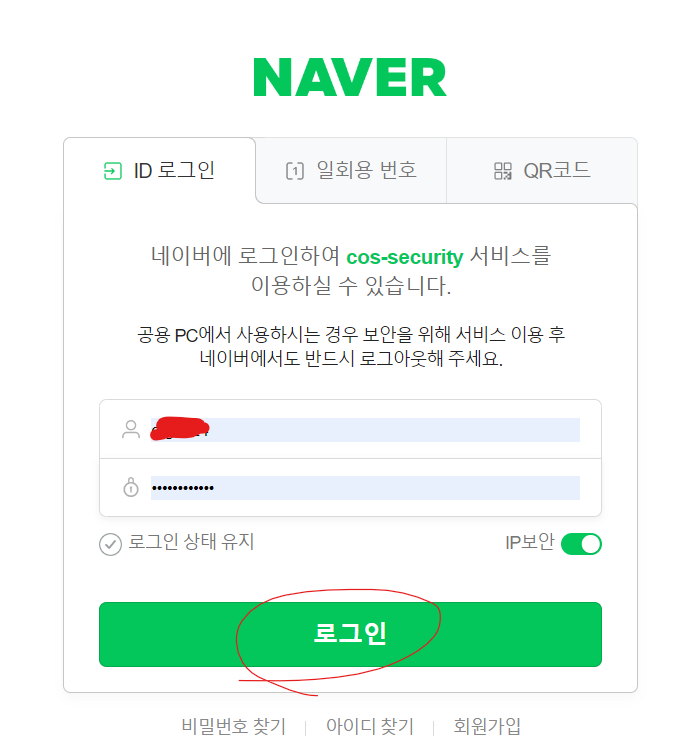
기능 구현
이전 프로젝트에 이어서 naver 경로를 추가하여 기능을 구현합니다.
< loginForm.html >
<!DOCTYPE html>
<html lang="en">
<head>
    <meta charset="UTF-8">
    <title>로그인 페이지</title>
</head>
<body>
<h1>로그인 페이지</h1>
<hr/>
<form action="/login" method="post">
    <input type="text" name="username" placeholder="Username"/> <br/>
    <input type="password" name="password" placeholder="Password"/> <br/>
    <button>로그인</button>
</form>
<a href="/oauth2/authorization/google">구글 로그인</a><!--주소는 고정이기 때문에 마음대로 바꿔 적을 수 있는게 아니다.-->
<a href="/oauth2/authorization/facebook">페이스북 로그인</a>
<a href="/oauth2/authorization/naver">네이버 로그인</a> <!--네이버 추가 -->
<a href="/joinForm">회원가입을 아직 하지 않으셨나요?</a>
</body>
</html>
< PrincipalOauth2 UserService.java >
package com.cos.security1.config.oauth;

import com.cos.security1.config.auth.PrincipalDetails;
import com.cos.security1.config.auth.provider.FacebookUserInfo;
import com.cos.security1.config.auth.provider.GoogleUserInfo;
import com.cos.security1.config.auth.provider.NaverUserInfo;
import com.cos.security1.config.auth.provider.OAuth2Userinfo;
import com.cos.security1.model.User;
import com.cos.security1.repository.UserRepository;
import org.springframework.beans.factory.annotation.Autowired;
import org.springframework.security.crypto.bcrypt.BCryptPasswordEncoder;
import org.springframework.security.oauth2.client.userinfo.DefaultOAuth2UserService;
import org.springframework.security.oauth2.client.userinfo.OAuth2UserRequest;
import org.springframework.security.oauth2.core.OAuth2AuthenticationException;
import org.springframework.security.oauth2.core.user.OAuth2User;
import org.springframework.stereotype.Service;

import java.util.Map;

@Service
public class PrincipalOauth2UserService extends DefaultOAuth2UserService {

    @Autowired
    private BCryptPasswordEncoder bCryptPasswordEncoder;
    @Autowired
    private UserRepository userRepository;

    //구글로 부터 받은 userRequest 데이터에 대한 후처리되는 함수이다.
    //함수 종료시 @AuthenticationPrincipal 어노테이션이 만들어진다.
    @Override // 후처리 기능
    public OAuth2User loadUser(OAuth2UserRequest userRequest) throws OAuth2AuthenticationException {
        //getClientRegistration -> registrationId로 어떤 OAuth로 로그인 했는지 확인 가능.
        System.out.println("getClientRegistration = " + userRequest.getClientRegistration()); // 서버의 기본 정보를 출력한다.
        System.out.println("getAccessToken = " + userRequest.getAccessToken().getTokenValue()); // 패스워드 토큰 값
        // 구글로그인 버튼 클릭 -> 구글로그인 창-> 로그인을 완료-> code를 리턴(OAuth-Client 라이브러리)-> AccessToken 요청
        // 위 까지가 userRequest 정보이다.

        OAuth2User oAuth2User = super.loadUser(userRequest);
        // userRequest 정보 -> loadUser 함수 호출->구글로부터 회원프로필 받아준다.
        System.out.println("getAttributes = " + oAuth2User.getAttributes()); // 회원 정보 출력

        // 회원 가입을 강제로 진행해볼 예정
        OAuth2Userinfo oAuth2Userinfo = null;
        if(userRequest.getClientRegistration().getRegistrationId().equals("google")){
            System.out.println("구글 로그인 요청");
            oAuth2Userinfo = new GoogleUserInfo(oAuth2User.getAttributes()); // GoogleUserInfo에 요청

        }else if (userRequest.getClientRegistration().getRegistrationId().equals("facebook")){
            System.out.println("페이스북 로그인 요청");
            oAuth2Userinfo = new FacebookUserInfo(oAuth2User.getAttributes());
        }else if (userRequest.getClientRegistration().getRegistrationId().equals("naver")) {
            System.out.println("네이버 로그인 요청");
            oAuth2Userinfo = new NaverUserInfo((Map)oAuth2User.getAttributes().get("response"));
        }else {
            System.out.println("우리는 구글과 페이스북과 네이버만 지원해요.");
        }


        String provider = oAuth2Userinfo.getGetProvider(); // google
        String providerId = oAuth2Userinfo.getProviderId(); // null값
//        String providerId = oAuth2User.getAttribute("id"); // null값 facebook name
        String username = provider + "_" + providerId; //google_113058107580252297024
        String password = bCryptPasswordEncoder.encode("겟인데어"); // 암호화 설정
        String email = oAuth2Userinfo.getEmail();
        String role = "ROLE_USER";

        //해당 아이디가 있는지 확인
        User userEntity = userRepository.findByUsername(username);

        if (userEntity == null){ // 해당 아이디를 못찾았다면
            System.out.println("OAuth 로그인이 최초입니다.");
            userEntity = User.builder()
                    .username(username)
                    .password(password)
                    .email(email)
                    .role(role)
                    .provider(provider)
                    .providerId(providerId)
                    .build();
            userRepository.save(userEntity);
        }else {
            System.out.println("로그인을 이미 한적이 있습니다. 당신은 자동 회원가입이 되어 있습니다.");
        }


        // {sub=113058107580252297024,

        return new PrincipalDetails(userEntity, oAuth2User.getAttributes());
        // 생성되면 Authentication 객체 안에 들어간다.

    }
}
< OAuth2 Userinfo >
package com.cos.security1.config.auth.provider;

public interface OAuth2Userinfo {

    String getProviderId(); // google,naver, facebook
    String getGetProvider();// google, naver, facebook
    String getEmail();
    String getName();

}
< NaverUserInfo >
package com.cos.security1.config.auth.provider;

import java.util.Map;

public class NaverUserInfo implements OAuth2Userinfo{

    private Map<String, Object> attributes; // => oAuth2User.getAttributes()

    public NaverUserInfo(Map<String, Object> attributes) {
        this.attributes =attributes;
    }

    @Override
    public String getProviderId() {
        return (String)attributes.get("id");
    }

    @Override
    public String getGetProvider() {
        return "naver";
    }

    @Override
    public String getEmail() {
        return (String)attributes.get("email");
    }

    @Override
    public String getName() {
        return (String)attributes.get("name");
    }
}
< SecurityConfig >
package com.cos.security1.config;

//1.코드받기(인증) 2.엑세스토큰(권한)
// 3.사용자 프로필 정보를 가져오고
// 4-1. 그 정보를 토대로 회원가입을 자동으로 진행시키기도 함.
// 4-2. (이메일,전화번호,이름,아이디) 쇼핑몰->(집 주소), 백화점몰 --> (vip등급, 일반등급) 등 추가적인 구성이 필요하다.

import com.cos.security1.config.oauth.PrincipalOauth2UserService;
import org.springframework.beans.factory.annotation.Autowired;
import org.springframework.context.annotation.Bean;
import org.springframework.context.annotation.Configuration;
import org.springframework.security.config.annotation.method.configuration.EnableGlobalMethodSecurity;
import org.springframework.security.config.annotation.web.builders.HttpSecurity;
import org.springframework.security.config.annotation.web.configuration.EnableWebSecurity;
import org.springframework.security.web.SecurityFilterChain;

@Configuration
@EnableWebSecurity // 스프링 시큐리티 필터가 스프링 필터체인에 등록이 된다.
@EnableGlobalMethodSecurity(securedEnabled = true, prePostEnabled = true)
//secured 어노테이션 활성화 , preAuthorize 어노테이션 활성화
public class SecurityConfig { // 스프링 필터 역할

    @Autowired
    private PrincipalOauth2UserService principalOauth2UserService;

    @Bean
    public SecurityFilterChain filterChain(HttpSecurity http) throws Exception {
        return http
                .csrf().disable()
                .authorizeRequests()
                .antMatchers("/user/**").authenticated() // 인증만 되면 들어갈 수 있는 주소!!
                .antMatchers("/manager/**").access("hasRole('ROLE_ADMIN') or hasRole('ROLE_MANAGER')")
                .antMatchers("/admin/**").access("hasRole('ROLE_ADMIN')")
                .anyRequest().permitAll()
                .and()
                .formLogin()
                .loginPage("/loginForm")
                .loginProcessingUrl("/login")// login 주소가 호출이 되면 시큐리티가 낚아채서 대신 로그인을 진행해준다.
                .defaultSuccessUrl("/")
                .and()
                .oauth2Login()
                .loginPage("/loginForm") //구글 로그인이 완료된 뒤의 후처리가 필요함. Tip. 코드x,(액세스토큰 + 사용자프로필정보 o)
                .userInfoEndpoint()
                .userService(principalOauth2UserService)
                .and().and().build();

    }
}
< Controller >
package com.cos.security1.controller;
import com.cos.security1.config.auth.PrincipalDetails;
import com.cos.security1.model.User;
import com.cos.security1.repository.UserRepository;
import lombok.RequiredArgsConstructor;
import org.springframework.security.access.annotation.Secured;
import org.springframework.security.access.prepost.PreAuthorize;
import org.springframework.security.core.Authentication;
import org.springframework.security.core.annotation.AuthenticationPrincipal;
import org.springframework.security.core.userdetails.UserDetails;
import org.springframework.security.crypto.bcrypt.BCryptPasswordEncoder;
import org.springframework.security.oauth2.core.user.OAuth2User;
import org.springframework.stereotype.Controller;
import org.springframework.web.bind.annotation.GetMapping;
import org.springframework.web.bind.annotation.PostMapping;
import org.springframework.web.bind.annotation.ResponseBody;
@Controller // View를 리턴하겠다!!
@RequiredArgsConstructor
public class IndexController {
private final UserRepository userRepository;
private final BCryptPasswordEncoder bCryptPasswordEncoder;
//스프링 시큐리티는 자기만의 시큐리티 세션을 갖고 있다. DI를 주입하려면 Authentication 객체가 꼭 필요하다.
//Authentication 안에 들어갈 수 있는 타입은 딱 두개다.
// UserDetails -> 일반 로그인
// OAuth2User -> facebook, sns 등 OAuth 타입으로 로그인
// 그럼 컨트롤러에 사용하려면 어떻게 해야할까?
// 부모 클래스를 만들어서 상속 시켜주면 된다.
@GetMapping("/test/login")
public @ResponseBody String testLogin(Authentication authentication,
@AuthenticationPrincipal PrincipalDetails userDetails){ // DI(의존성 주입)
// @AuthenticationPrincipal=> 세션 정보에 접근할 수 있게 해준다.
// PrincipalDetails로도 세션 정보에 접근할 수 있다. 왜냐면 UserDetails를 implements 했기 때문에,
// 그렇다면 getUsername()으로 호출하는게 아니라 getUser()로 호출해줘야 한다.
System.out.println("/test/login ======================");
PrincipalDetails principalDetails = (PrincipalDetails) authentication.getPrincipal() ;
System.out.println("authentication = " + principalDetails.getUser()); // authentication.getPrincipal() 리턴 타입 => Object
System.out.println("userDetails = " + userDetails.getUser());
return "세션 정보 확인하기";
}
@GetMapping("/test/oauth/login")
public @ResponseBody String testOAuthLogin(Authentication authentication , @AuthenticationPrincipal OAuth2User oAuth){ // DI(의존성 주입)
System.out.println("/test/oauth/login ======================");
OAuth2User oAuth2User = (OAuth2User) authentication.getPrincipal() ;
System.out.println("authentication = " + oAuth2User.getAttributes()); // authentication.getPrincipal() 리턴 타입 => Object
System.out.println("oAuth2User = " + oAuth.getAttributes());
return "OAuth 세션 정보 확인하기";
}
//localhost:8080/
//localhost:8080
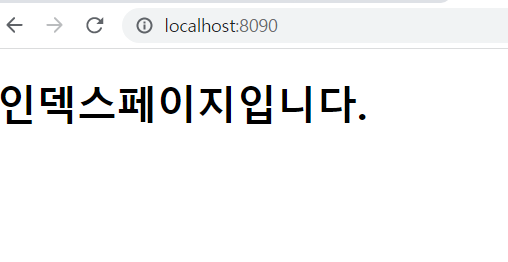
@GetMapping({"","/"})
public String index(){
//머스테치 기본폴더 src/main/resources/
//뷰리졸버 설정 : templates (prefix), .mustache(suffix) 생략가능!!
return "index";
}
//OAuth 로그인을 해도 PrincipalDetails
//일반 로그인을 해도 PrincipalDetails
@GetMapping("/user")
public @ResponseBody String user(@AuthenticationPrincipal PrincipalDetails principalDetails){
System.out.println("principalDetails = " + principalDetails.getUser());
return "user";
}
@GetMapping("/admin")
public @ResponseBody String admin(){
return "admin";
}
@GetMapping("/manager")
public @ResponseBody String manager(){
return "manager";
}
// 스프링 시큐리티 해당주소를 낚아채버리네요!! - SecurityConfig 파일 생성 후 작동 안함.
@GetMapping("/loginForm")
public String loginForm(){
return "loginForm";
}
@GetMapping("/joinForm")
public String joinForm(){
return "joinForm";
}
@PostMapping("/join")
public String join(User user){
System.out.println("user = " + user);
user.setRole("ROLE_USER");
// 이유는 패스워드가 암호화가 안되었기 때문에
String rawPassword = user.getPassword();
String encPassword = bCryptPasswordEncoder.encode(rawPassword);
user.setPassword(encPassword);
userRepository.save(user); // 회원가입 잘됨. 비밀번호 : 1234 => 시큐리티로 로그인을 할 수 없다.
return "redirect:/loginForm";
}
@Secured("ROLE_ADMIN") //하나만 걸고 싶다면 Secured 만 하면 된다.
@GetMapping("/info")
public @ResponseBody String info(){
return "개인정보";
}
@PreAuthorize("hasRole('ROLE_MANAGER') or hasRole('ROLE_ADMIN')") //여러개 걸고 싶다면?
@GetMapping("/data")
public @ResponseBody String data(){
return "데이터정보";
}
}< PrincipalDetails >
package com.cos.security1.config.auth;

//시큐리티가 /login 주소 요청이 오면 낚아채서 로그인을 진행시킨다.
//로그인의 진행이 완료가 되면 시큐리티 session을 만들어준다.(Security ContextHolder)
//오브젝트 = > Authentication 타입 객체
//Authentication 안에 User 정보가 있어야 됨
//User 오브젝트 타입 => UserDetails 타입 객체

//Security Session => Authentication => UserDetails(PrincipalDetails)

import com.cos.security1.model.User;
import lombok.Data;
import org.springframework.security.core.GrantedAuthority;
import org.springframework.security.core.userdetails.UserDetails;
import org.springframework.security.oauth2.core.user.OAuth2User;

import java.util.ArrayList;
import java.util.Collection;
import java.util.Map;
//PrincipalDetails를 생성한 이유?
// 시큐리티 세션 정보에는 하나만 들어갈 수 있다. Authentication 객체이다.
// Authentication에는 두개의 필드가 있다.
// OAuth2User 타입, UserDetails 타입이다.

//만약 회원가입을 한다면? 회원가입 -> user 오브젝트가 필요하다.
//하지만 OAuth2User,UserDetails 타입은 user 오브젝트를 포함하고 있지 않다.
//세션에 저장되는데, 세션을 가지고 와도 user 오브젝트를 찾을 수 없다.
// 그래서 PrincipalDetails 라는 클래스를 만들고
// UserDetails Impl 해서 같은 타입으로 묶어서
// 여기에다 user 오브젝트를 품어논다.
// 그러면 userDetails 를 대신해서 PrincipalDetails를 사용하므로
// user 오브젝트에 접근할 수 있다.
// 두개의 타입을 별도의 클래스를 사용해서 만들면 복잡해 지기 때문에
// 부모 클래스에 같이 묶어서 꺼내쓴다.
// 그렇다면 꺼내 쓸때 PrincipalDetails 타입만 꺼내 쓰면 된다.
// 그 안에는 user 오브젝트가 있다.

@Data
public class PrincipalDetails implements UserDetails, OAuth2User {


    private User user; // 콤포지션
    private Map<String, Object> attributes;

    // 일반 로그인 생성자
    public PrincipalDetails(User user) {
        this.user=user;
    }
    //OAuth 로그인 생성자
    public PrincipalDetails(User user, Map<String, Object> attributes) {
        this.user=user;
        this.attributes=attributes;
    }


    //해당 User의 권한을 리턴하는 곳!!

    @Override //
    public Collection<? extends GrantedAuthority> getAuthorities() {
        Collection<GrantedAuthority> collect = new ArrayList<>(); // ArrayList는 Collection의 자식 타입이다.
        collect.add(new GrantedAuthority() {
            @Override
            public String getAuthority() {
                return user.getRole(); // Object 타입을 String 으로 변환해서 return
            }
        });
        return collect;
    }
    @Override // password
    public String getPassword() {
        return user.getPassword();
    }

    @Override // name
    public String getUsername() {
        return user.getUsername();
    }

    // 계정 만료 여부
    @Override // 해당 계정 만료 했는지?
    public boolean isAccountNonExpired() {
        return true;
    }
    // 계정 잠김 여부
    @Override // 해당 계정이 잠겨 있는지?
    public boolean isAccountNonLocked() {
        return true;
    }
    // 계정만료 기간이 지났는지 여부
    @Override // 해당 계정의 비밀번호가 1년이 지났는지?
    public boolean isCredentialsNonExpired() {
        return true;
    }
    // 계정 활성화 여부

    @Override // 해당 계정이 활성화 되어있는지?
    public boolean isEnabled() {

        // 우리 사이트!! 1년동안 회원이 로그인을 안하면 !! 휴먼 계정으로 하기로 함.
        // 현재시간 - 로긴시간 => 1년을 초과하면 return false;
        return true;
    }
    // OAuth2User 등록하면 getAttributes,getName 메서드가 오버라이드 된다.
    @Override
    public Map<String, Object> getAttributes() {
        return attributes;
    }

    @Override // 사용안함
    public String getName() {
        return null;

    }
}
< model >
package com.cos.security1.model;

import lombok.Builder;
import lombok.Data;
import lombok.NoArgsConstructor;
import org.hibernate.annotations.CreationTimestamp;

import javax.persistence.Entity;
import javax.persistence.GeneratedValue;
import javax.persistence.GenerationType;
import javax.persistence.Id;
import java.sql.Timestamp;

@Entity
@Data
@NoArgsConstructor //default constructor
public class User {

    @Id // primary key
    @GeneratedValue(strategy = GenerationType.IDENTITY)
    private int id;
    private String username;
    private String password;
    private String email;
    private String role; // ROLE_USER, ROLE_ADMIN

    private String provider;
    private String providerId;

    @CreationTimestamp
    private Timestamp createDate;

    @Builder
    public User(String username, String password, String email, String role, String provider, String providerId, Timestamp createDate) {
        this.username = username;
        this.password = password;
        this.email = email;
        this.role = role;
        this.provider = provider;
        this.providerId = providerId;
        this.createDate = createDate;
    }
}
RUN

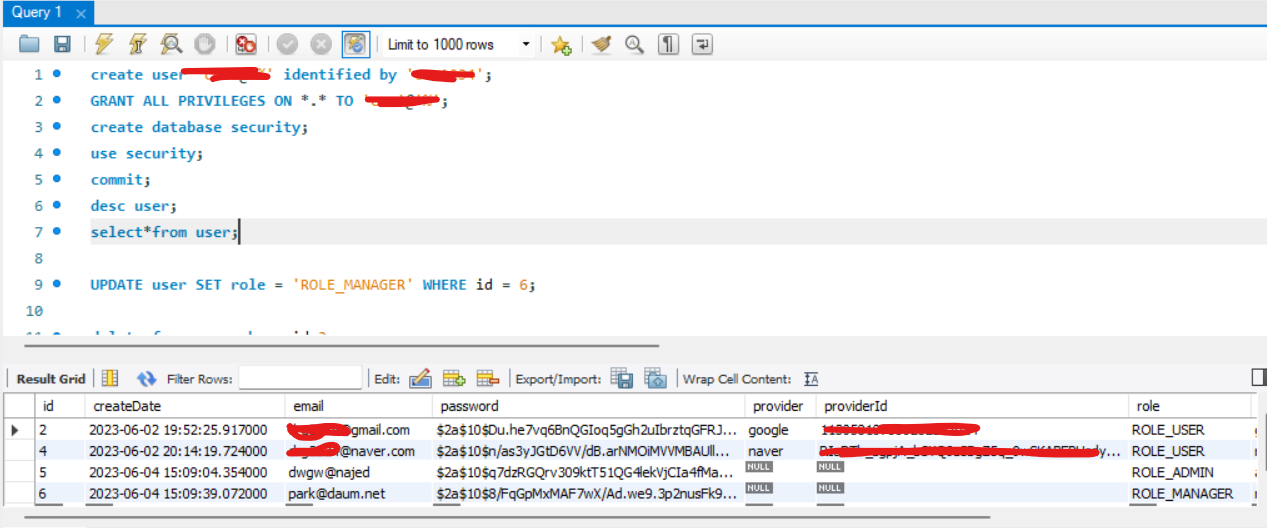
마지막으로 DB에 제대로 들어왔는지 확인해 보겠습니다.
마치며
오늘은 네이버 소셜 로그인에 대해서 알아보았습니다.
다음 포스팅에 뵙겠습니다.
'[ JAVA ] > JAVA Spring Security' 카테고리의 다른 글
| [ Spring Boot ] Spring Security - 회원가입 및 로그인 (1) | 2023.09.26 |
|---|---|
| [ Spring Boot ] Spring Security - 기본 개념 및 예제 (0) | 2023.09.25 |
| [ Spring Boot ] OAuth2 - Google 소셜 로그인 (1) | 2023.06.02 |
| [ Spring Boot ] OAuth2 - Google Cloud 프로젝트 생성 (0) | 2023.06.01 |
| [ Spring ] Security 개념 (0) | 2023.05.30 |