
오늘은 이전 포스팅에서 구현한 로그인 기능에서 잘못된 정보를 입력하면 메시지를 보여주는 것을 목표로 하고 구현해 보겠습니다.
[ Spring Boot ] Spring Security - 기본 개념 및 예제
취준 활동을 끝내고 백엔드 개발자로 경력을 쌓기 위한 회사를 찾기 위해 이곳저곳 면접을 다니고, 회사 소스 코드 파악 및 프로젝트 투입 준비를 하다 보니 블로그를 소홀하게 관리했네요.. 오
drg2524.tistory.com
[ Spring Boot ] Spring Security - 회원가입 및 로그인
이전 포스팅에서 security 기본 개념에 대해 알아봤습니다. Spring Security에 대해 궁금하다면 아래 포스팅을 참고하면 될 것 같습니다. [ Spring Boot ] Spring Security - 기본 개념 및 예제 취준 활동을 끝내
drg2524.tistory.com
[ Spring Boot ] Spring Security - 회원가입 Validation Check
이전 포스팅에서 Spring Security를 활용해서 회원가입 및 로그인 기능을 코드 구현으로 알아보았습니다. [ Spring Boot ] Spring Security - 기본 개념 및 예제 취준 활동을 끝내고 백엔드 개발자로 경력을
drg2524.tistory.com
현재 상태로는 로그인 페이지에서 잘못된 정보를 입력하면, 아무런 메시지를 보지 못하고 로그인 페이지만 재로딩 될 것입니다.
로그인에 실패했으면 어떤 이유로 실패했는지 에러 메시지를 띄워주어야 한다고 생각하기 때문에 이번 포스팅에서 구현해 보겠습니다.
SecurityConfig
@Configuration
@EnableWebSecurity
@EnableGlobalMethodSecurity(prePostEnabled = true)
public class SecurityConfig{

	@Autowired
	private PrincipalDetailsService principalDetails;

	// security 로그인 실패 핸들러 DI
	@Autowired
	private  AuthenticationFailureHandler customFailHandler;

	@Autowired
	private BCryptPasswordEncoder encodePwd;

	@Bean
	public SecurityFilterChain filterChain(HttpSecurity http) throws Exception{
		return http
				.csrf() // csrf 선언  = 어디에 쓸꺼야 ?
				.ignoringAntMatchers("/uploadSummernoteImageFile")
				.ignoringAntMatchers("/user/**")
				.ignoringAntMatchers("/auth/**")
				.ignoringAntMatchers("/admin/**")// csrf token Post 403 error Exception filter
				.and()
				.authorizeRequests()
				.antMatchers("/include/**","/temcss/**","temjs/**").permitAll()
				.antMatchers("/").authenticated()
				.antMatchers("/admin/**").access("hasRole('ROLE_ADMIN')")
				.antMatchers("/manager/**").access("hasRole('ROLE_MANAGER') or hasRole('ROLE_ADMIN')")
				.anyRequest().permitAll()
				.and()
				.formLogin()// 나는 폼 로그인을 사용할거야 !
				.loginPage("/auth/loginForm") // 근데 난 로그인 폼이 있어  이 경로야 !
				.usernameParameter("userid") // 근데 난 username이라고 선언 안해. 별도로  name 선언 했어
				.passwordParameter("pwd") // 동일해
				.loginProcessingUrl("/auth/login") // security login // 로그인 요청 들어왔어 !! true / false ?
				.failureHandler(customFailHandler) // login Fail // false
				.defaultSuccessUrl("/") // true
				.and()
				.logout()
				.logoutSuccessUrl("/")
				.invalidateHttpSession(true) // HTTP session reset
				.and()
				.build();

	}
SecurityConfig 파일에 추가된 부분은 실패 핸들러를 적용해 주었습니다.
- private AuthenticationFailureHandler customFailHandler;
- .failureHandler(customFailHandler) // login Fail // false
로그인 페이지에서 요청이 들어왔을 때 입력된 정보가 없거나, 일치하지 않다면 핸들러에 요청을 보내서 처리를 해줍니다.
CustomAuthFailHandler
CustomAuthFailHandler 클래스는 로그인 실패를 핸들링하는 커스텀 핸들러입니다.
대체적으로 AuthenticationFailureHandler를 implements를 해서 사용하는데,
SimpleUrlAuthenticationFailureHandler를 상속시키면 AuthenticationFailureHandler를 implements 한 것과 같게 됩니다.
그 이유는 SimpleUrlAuthenticationFailureHandler가 해당 인터페이스를 구현한 것이기 때문에, 이를 상속하면 자동으로 해당 인터페이스를 구현한 것이 됩니다.
그렇다면 굳이 SimpleUrlAuthenticationFailureHandler를 사용한 이유에 대해 말씀드리자면 저는 해당 클래스에서 제공해 주는 setDefaultFailureUrl() 메서드를 활용하기 위해서입니다.
해당 메서드를 활용하면 로그인 실패 시 url을 지정해 줍니다.
단, 해당 url은 Controller에 매핑되어 있어야 합니다.
//security exception handler
@Component
public class CustomAuthFailHandler extends SimpleUrlAuthenticationFailureHandler {
	private static final Logger logger = LoggerFactory.getLogger(CustomAuthFailHandler.class);

	@Autowired
	private MemberService memberService;

	@Override
	public void onAuthenticationFailure(HttpServletRequest request, HttpServletResponse response,
			AuthenticationException exception) throws IOException, ServletException {

		String errorMessage = null;

		String userid = request.getParameter("userid");

		logger.info("로그인 실패 유저 아이디 값 = {}", userid);

		if (exception instanceof BadCredentialsException) { // 잘못된 자격 증명
			MemberDTO dto = failCnt(userid);

			Boolean userUnLock = dto.getFailCnt() < 4;
			logger.info("비밀번호 실패 횟수 = {}", dto.getFailCnt());
			if (!userUnLock) {
				errorMessage = "계정이 비활성화 상태입니다. 관리자에게 문의하세요..";
			} else {
				memberService.loginFailCnt(userid);
				errorMessage = "비밀번호가 " + (int) (dto.getFailCnt() + 1) + "회 틀렸습니다. 5번 실패 시 계정이 비 활성화 됩니다.";
			}

		} else if (exception instanceof InternalAuthenticationServiceException) { // 내부 인증 서비스 예외
			errorMessage = "아이디와 비밀번호를 입력해주세요.";

		} else if (exception instanceof UsernameNotFoundException) { // 사용자 정보 없음

			errorMessage = "아이디와 비밀번호가 일치하지 않습니다.";

		} else if (exception instanceof AuthenticationCredentialsNotFoundException) { // 인증 자격 증명을 찾을 수 없음
			errorMessage = "인증 요청이 거부되었습니다. 관리자에게 문의하세요.";

		} else {
			errorMessage = "알 수 없는 이유로 로그인에 실패하였습니다 관리자에게 문의하세요.";
		}

		errorMessage = URLEncoder.encode(errorMessage, "UTF-8");

		setDefaultFailureUrl("/auth/loginForm?error=true&exception=" + errorMessage);

		super.onAuthenticationFailure(request, response, exception);
	}

	private MemberDTO failCnt(String userid) {

		MemberDTO account = memberService.getFailCnt(userid);

		logger.info("failCnt 디비 요청 = {}", account.getFailCnt());

		return account;
	}
}
onAuthenticationFailure를 오버라이딩하여 예외처리를 해주고, 에러 메시지를 띄워줍니다.
Controller
@GetMapping("/auth/loginForm")
	public String loginForm(@RequestParam(value = "error", required = false) String error,
			@RequestParam(value = "exception", required = false) String exception,
			Model model,
			@LoginUser MemberSessionDTO user) {

		model.addAttribute("error", error);
		model.addAttribute("exception", exception);

		if(user != null) {
			model.addAttribute("user", user.getUsername());
		}

		return "loginForm";
	}
@RequestParam으로 넘겨진 error와 exception을 model에 담은 후, mustache 파일에 적용할 수 있도록 뷰 리졸버 해줍니다.
loginForm.mustache
<!DOCTYPE html>
<html>
<head>
<meta charset="UTF-8">
<title>login</title>
</head>
<link  rel="stylesheet" href="/temcss/user.css">
<link  rel="stylesheet" href="/include/css/bootstrap.css">
<link  rel="stylesheet" href="/include/style.css">
<body>
<div id="posts_list">
	<div class="container">
		<table border="3" class="mainLogo">
			<tr>
				<td>
				<h1>로그인 페이지</h1>
				</td>
			</tr>
			<tr>
				<td>
				<h3>게시판</h3>
				</td>
			</tr>

		</table>
	</div>
	<br>
	<div class="container col-md-6">
		<form id="form1" name="form1" method="POST" >
		<input type="hidden" name="_csrf" value="{{_csrf.token}}"/>
		<div class="form-group">
			<label>ID</label>
			<input class="form-control" id="userid" name="userid" maxlength="16" onkeydown="noSpaceForm(this);" placeholder="ID를 입력해주세요." >
			 <span id="useridError" class="error" style="color: red;"></span>
		</div>
		<br>
		<div class="form-group">
			<label>PASS WORD</label>
			<input type="password" class="form-control" id="pwd" name="pwd" maxlength="16" onkeydown="noSpaceForm(this);" placeholder="Pass Word를 입력해주세요."  onkeyup="pwdenterkey()">
			 <span id="pwdError" class="error" style="color: red;"></span>
		</div>

		<span>
			{{#error}}
				<p id="valid" class="alert alert-danger">{{exception}}</p>
			{{/error}}
		</span>
		<br>
			<button type="button" class="form-control btn btn-primary bi bi-lock-fill" onclick="logincheck()">Login</button>
		<br>
		<div>
			<p>회원이 아니세요? <a href="/auth/joinForm">회원가입하기</a></p>
		</div>

		</form>
	</div>
</div>
{{>layout/footer}}
</body>
</html>
{{#error}} 머스테치 문법으로 만약 에러가 있다면 exception 에러 메시지를 보여주도록 추가했습니다.
JS
function logincheck() {
const userid = $('#userid').val();
const pwd = $('#pwd').val();
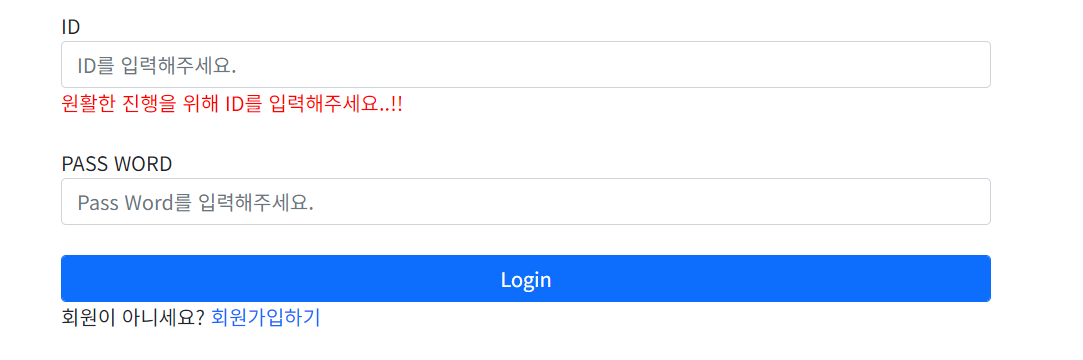
if(userid == ""){
//alert("ID를 입력해주세요.");
$('#useridError').text('원활한 진행을 위해 ID를 입력해주세요..!!');
$('#userid').focus();
return false;
}else{
$('#useridError').text('');
}
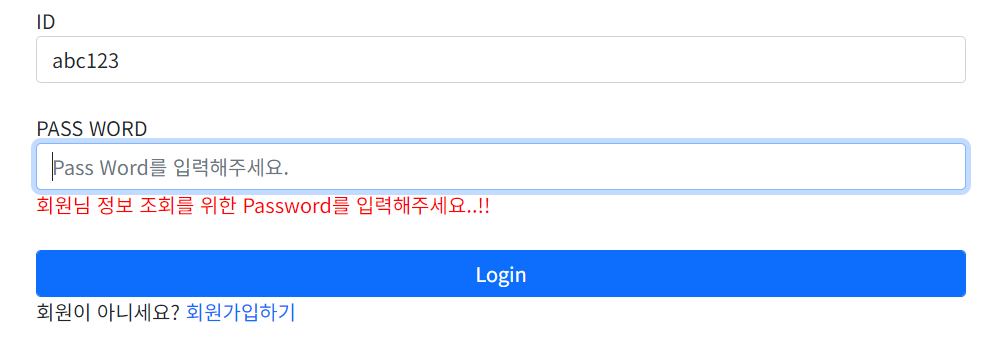
if(pwd == ""){
$('#pwdError').text('회원님 정보 조회를 위한 Password를 입력해주세요..!!');
$('#pwd').focus();
return false;
}else {
$('#pwdError').text('');
}
document.form1.action="/auth/login";
document.form1.submit();
}
function pwdenterkey() {
const userid = $('#userid').val();
const pwd = $('#pwd').val();
if (window.event.keyCode == 13) {
if(userid == ""){
//alert("ID를 입력해주세요.");
$('#useridError').text('원활한 진행을 위해 ID를 입력해주세요..!!');
$('#userid').focus();
return false;
}else{
$('#useridError').text('');
}
if(pwd == ""){
$('#pwdError').text('회원님 정보 조회를 위한 Password를 입력해주세요..!!');
$('#pwd').focus();
return false;
}else {
$('#pwdError').text('');
}
document.form1.action="/auth/login";
document.form1.submit();
}
}출력 결과
빈 값이 들어오면 onclick으로 처리하기 때문에 JS에서 먼저 유효성 검사가 진행됩니다.
비밀번호 텍스트 박스에서는 onkeyup을 활용해서 window 엔터 이벤트 처리를 통해서 엔터키 입력값이 들어오면 로그인 진행이 될 수 있게 처리했습니다.
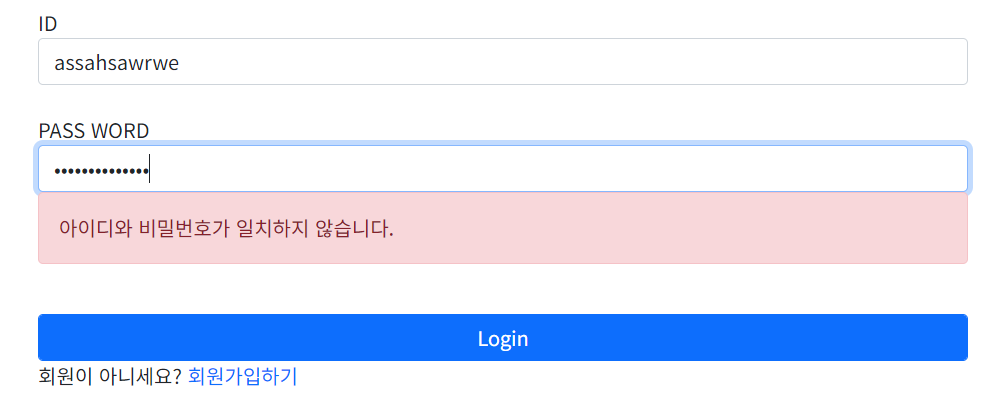
테스트를 진행하기 위해 DB 테이블에 없는 데이터 값을 입력했더니 CustomAuthFailHandler 클래스에서 UsernameNotFoundException 처리를 했던 "아이디와 비밀번호가 일치하지 않습니다." 에러 메시지를 띄워줬습니다.
여기서 좀 더 깊게 들어가자면, 필자는 BadCredentialException만 띄워주는 게 아닌, 다양한 exception 처리를 하기 위해
DaoAuthenticationProvider를 재설정했습니다.
@Autowired
private PrincipalDetailsService principalDetails;

@Autowired
private BCryptPasswordEncoder encodePwd;


@Bean
public DaoAuthenticationProvider daoAuthenticationProvider() {

		DaoAuthenticationProvider authenticationProvider = new DaoAuthenticationProvider();

		authenticationProvider.setUserDetailsService(principalDetails);

		authenticationProvider.setPasswordEncoder(encodePwd);

		authenticationProvider.setHideUserNotFoundExceptions(false);

		return authenticationProvider;
	}
[ DaoAuthenticationProvider 재설정한 이유 ]
Security Config에서 AuthenticationManager에 UserDetailsService를 등록해 주면
기본적으로 DaoAuthenticationProvider가 커스텀한 UserDetailsService를 가지고 있습니다.
DaoAuthenticationProvider에게 요청 온 로그인 정보를 가지고 인증 절차가 오면 UserDetailsService의 loadUserByUsername이 실행됩니다.
이때 UsernameNotFoundException. 에러가 발생되면 AbstractUserDetailsauthenticationProvider의 hideUserNotFoundException(Boolean)을 확인하여 BadCredentialsException을 내보내게 되어있습니다.(default)
UsernameNotFoundException을 사용하려면 위 빈처럼 DaoAuthenticationProvider를 재 설정해야 하는데 별도로 Exception을 날리는 것보다 BadCredentialException 하나만 날리는 것이 보다 더 보안이 강합니다.
더 강한 보안을 위해서라면 모두 BadCredentialException을 호출하는 것이 맞습니다.
재 설정을 했기 때문에, BadCredentialException이 발생하는 게 아닌, UsernameNotFoundException 처리가 될 수 있었습니다.
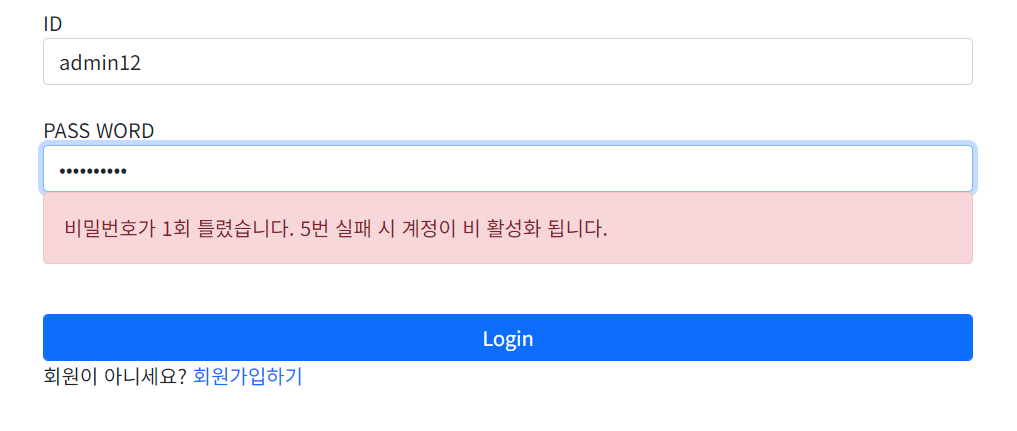
DB에 저장된 데이터 값으로 테스트를 진행한 결과, BadCredentialsException이 발생하고 해당 메시지를 띄울 수 있었습니다.
여기서 추가로 봐야 할 정보로는 setDefaultFailureUrl()을 사용하면

위 사진처럼 URL 처리가 됩니다.
마치며
오늘은 로그인 실패 핸들러 처리를 해보았습니다.
중간에 비밀번호 5회 체크 코드가 들어있는데 5회 체크에 대해서는 다음 포스팅에서 다뤄 보겠습니다.
'[ JAVA ] > JAVA Spring Security' 카테고리의 다른 글
| [ Security ] Spring Security - 사용자 권한 별 인증 처리하기 (3) | 2024.12.30 |
|---|---|
| [ Security ] Spring Security 6.x 설정 방법 알아가기 (0) | 2024.08.19 |
| [ Spring Boot ] Spring Security - 회원가입 Validation Check (2) | 2023.10.04 |
| [ Spring Boot ] Spring Security - 회원가입 및 로그인 (1) | 2023.09.26 |
| [ Spring Boot ] Spring Security - 기본 개념 및 예제 (0) | 2023.09.25 |